 Save Pin
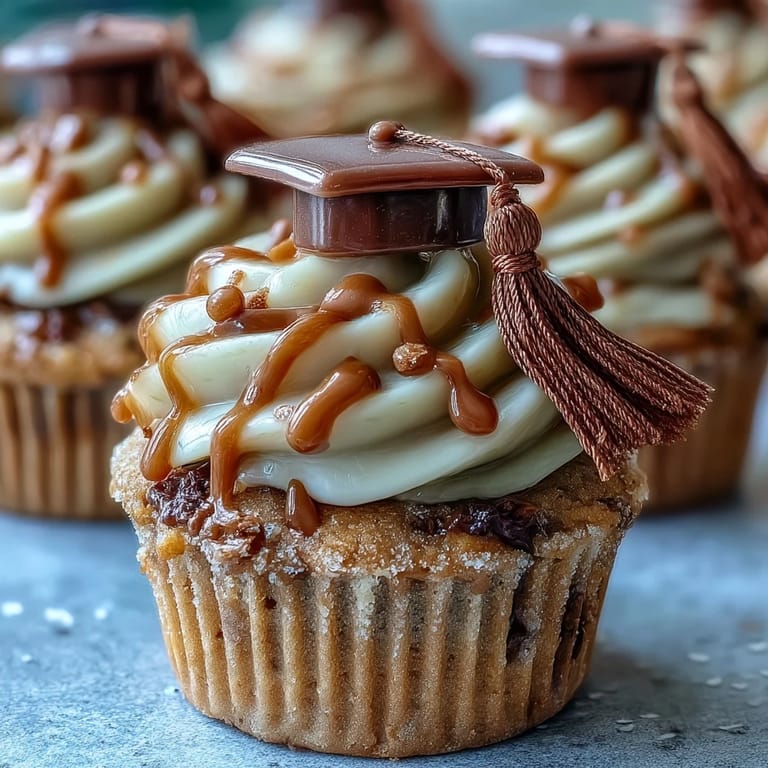
 My cousin called me in a panic two weeks before her graduation, asking if I could whip up something special for her party. I had about an hour to figure it out, and the idea hit me while standing in the baking aisle: cupcakes with tiny graduation caps on top. Something clicked that day about how the smallest, most playful details can turn an ordinary dessert into a memory nobody forgets.
When I brought these to my cousin's party, I watched her friends photograph them before eating them, which told me everything. There was something about the combination of something homemade with that playful touch that made people smile before they even took a bite. That moment proved to me that the effort really does show.
Ingredients
- All-purpose flour (1 1/2 cups): Use the spoon-and-level method to measure, not the scoop-and-shake approach, because too much flour makes them dense and grainy.
- Granulated sugar (1 cup): This sweetness balances the vanilla without overpowering it, and white sugar gives you that tender crumb.
- Unsalted butter, softened (1/2 cup for batter, 1/2 cup for frosting): Let it sit out for about 30 minutes before you start; cold butter won't cream properly and you'll end up frustrated.
- Large eggs (2): Room temperature eggs blend in smoothly and create a better texture than cold ones straight from the fridge.
- Whole milk (1/2 cup plus 2 tbsp): The liquid keeps these from becoming dry, and whole milk adds a subtle richness that people taste but can't quite name.
- Baking powder (1 1/2 tsp): This is your lift; don't skip it and don't use baking soda by mistake or they'll taste metallic.
- Salt (1/4 tsp in batter, pinch in frosting): Salt brings out the vanilla flavor, so don't leave it out thinking it won't matter.
- Pure vanilla extract (1 1/2 tsp in batter, 1 tsp in frosting): The pure stuff makes all the difference; imitation vanilla will leave a slightly chemical aftertaste.
- Powdered sugar, sifted (2 cups): Sift it before measuring or you'll end up with lumps that frustrate you while frosting.
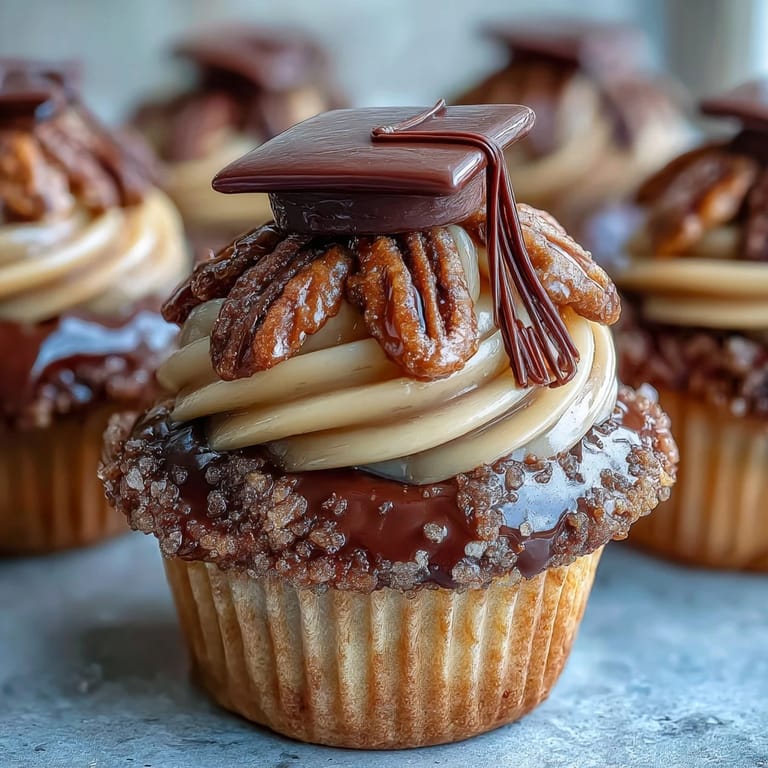
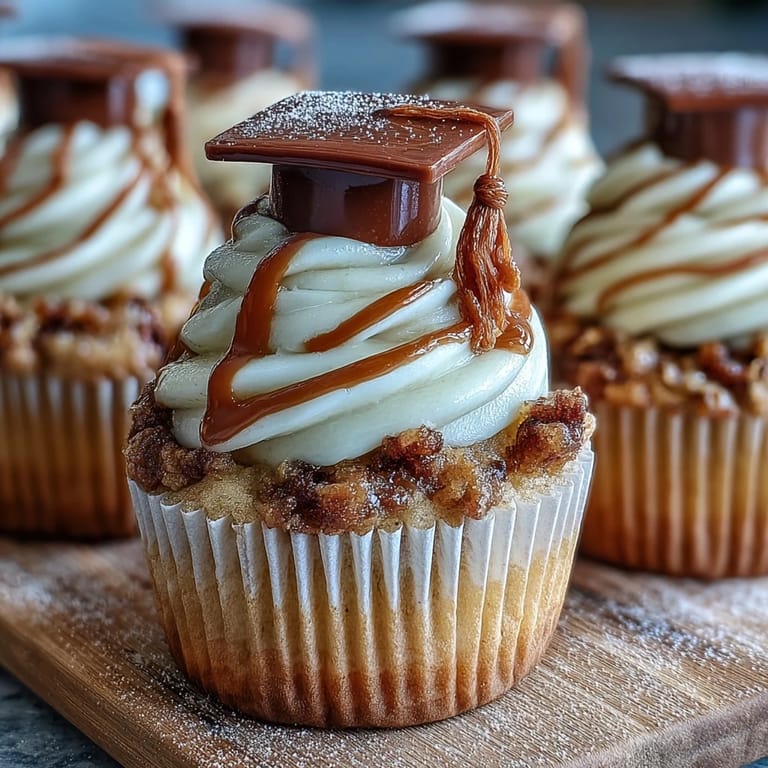
- Mini peanut butter cups or chocolate squares (12): These form the base of your graduation cap, and the peanut butter version adds a nice flavor contrast.
- Chocolate square candies like Ghirardelli (12): These sit flat and stable as the mortarboard part of the cap.
- String licorice or sour candy strips (12 pieces): These become your tassels and add color; use red and gold for school colors or pick colors that match the event.
- Mini M&Ms or candy pearls (12): The tiny button on top of each cap is where personality shows through.
- Melted chocolate or extra frosting: This is your glue; melted chocolate works faster, but frosting works just as well if you're patient.
Tired of Takeout? 🥡
Get 10 meals you can make faster than delivery arrives. Seriously.
One email. No spam. Unsubscribe anytime.
Instructions
- Heat your oven and prep your tin:
- Set the oven to 350°F and line your muffin tin with paper liners while it preheats. This takes 5 minutes and saves you from scrambling later.
- Cream the butter and sugar together:
- Beat them for about 2 minutes until they're pale and fluffy, which means you've beaten air into them. This is where the tender crumb starts.
- Add eggs one at a time:
- After each egg, beat for about 30 seconds before adding the next one. This keeps the mixture from looking curdled and broken.
- Stir in your vanilla:
- Just a quick stir here, about 30 seconds, then move on to the dry ingredients.
- Build your batter in stages:
- Mix in half the flour mixture, then add the milk, then the remaining flour. This prevents overmixing, which is the enemy of tender cupcakes.
- Divide and bake:
- Spoon batter evenly into the liners, about two-thirds full, and bake for 18 to 20 minutes until a toothpick comes out clean. The kitchen will smell unbelievably good around minute 15.
- Cool them completely:
- Let them sit in the tin for about 5 minutes, then transfer to a cooling rack. Frost them while they're still slightly warm if you want the frosting to meld a little, or wait until they're completely cool if you prefer a neater finish.
- Make your frosting:
- Beat the softened butter until it's creamy, then gradually add powdered sugar. If it looks too thick, add milk a tiny bit at a time until you reach spreading consistency.
- Frost with confidence:
- Use a small spatula or the back of a spoon to swirl the frosting onto each cupcake. Don't overthink it; imperfect swirls actually look more homemade and charming.
- Assemble your graduation caps:
- Lay out a chocolate square, dab a little melted chocolate or frosting in the center, press a mini peanut butter cup upside-down onto it, then attach your licorice tassel and M&M button. Let them set for 15 minutes before placing on the cupcakes.
- Crown each cupcake:
- Press a cap onto each frosted cupcake just before serving or up to an hour before for best appearance.
 Save Pin
 My sister made these for her daughter's graduation open house, and I watched people genuinely light up when they saw them. There's something about edible details that transforms a cupcake from dessert into a small celebration you can hold in your hand.
Why These Work for Any Celebration
The genius of this recipe is that the base cupcake is simple enough that you can focus your energy on the toppers, which are where the real fun happens. Once you master the cap assembly, you could swap out candies for different holidays or events without changing anything else. I've made Easter versions with pastel candies and Christmas versions with red and green licorice, and nobody can tell these started as a graduation cake.
Storing and Make-Ahead Strategy
You can bake the cupcakes up to two days ahead and keep them in an airtight container at room temperature, which means you can spread out the work. The frosting comes together in about 10 minutes the morning of your event, and the cap toppers can be assembled while you're having your coffee. I learned this by doing everything the night before my cousin's party and nearly losing my mind, so now I'm a big believer in breaking it into chunks.
Customizing for Your School or Theme
The beauty of these cupcakes is how personal you can make them without any actual recipe changes. You can tint the frosting with gel food coloring to match school colors, choose licorice tassels in team colors, or even swap the candies entirely for something that matches the graduating student's favorite flavors. I made a batch where the licorice tassels were gold and the M&Ms were blue and white, and they looked like actual graduation gowns.
- Add 2 to 3 drops of gel food coloring to frosting and mix until you reach the shade you want.
- String licorice comes in so many colors now that you can find almost any shade you're looking for.
- If someone has a nut allergy, just swap the peanut butter cups for more chocolate squares or any other flat candy.
 Save Pin
 These cupcakes have a way of making the moment feel special, which is exactly what a graduation deserves. Bake them with care and watch people's faces when they see those tiny caps.
Recipe FAQs
- → What ingredients create the cap toppers?
The cap toppers use mini peanut butter cups or chocolate squares, string licorice for tassels, and mini candies as buttons, assembled with melted chocolate or frosting.
- → How can I avoid nut allergens in these treats?
Opt for chocolate square candies instead of peanut butter cups to keep the cupcakes nut-free and safe for sensitive guests.
- → Can frosting colors be customized?
Yes, you can add food coloring to the buttercream frosting to match school or party colors for a more personalized presentation.
- → What is the best way to store these cupcakes?
Store in an airtight container at room temperature for up to two days to maintain freshness and texture.
- → How long does preparation and baking take?
Preparation takes about 25 minutes, baking about 20 minutes, resulting in a total time of approximately 45 minutes.
- → What tools are needed to make these cupcakes?
Essential tools include a muffin tin, paper liners, mixing bowls, an electric mixer, spatula, and a piping bag or spoon for frosting application.