 Save Pin
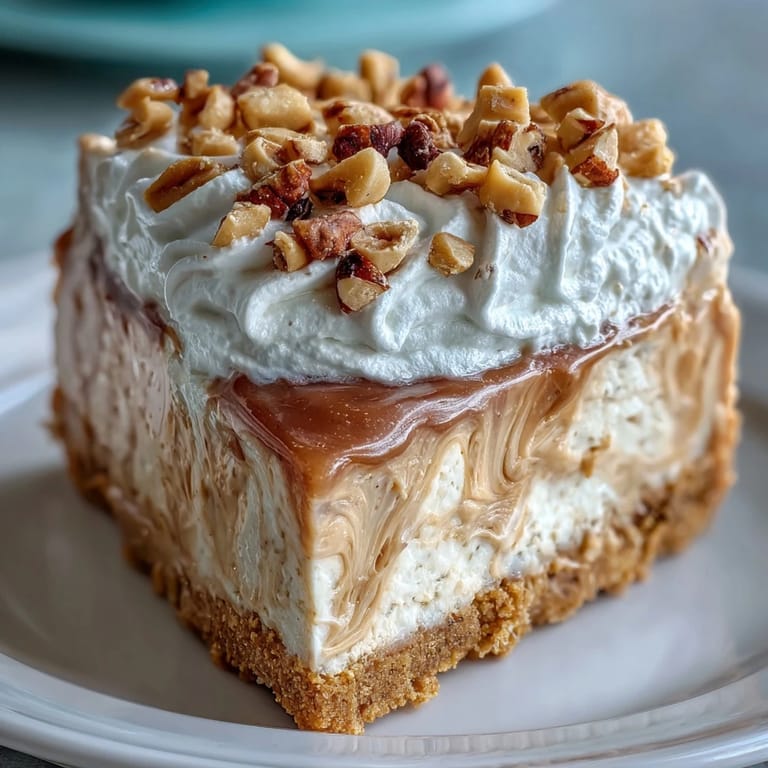
 My neighbor showed up one Saturday with a box of Nutter Butters and a wild idea. She wanted a cheesecake that tasted like those cookies, crust and all. I laughed, then realized she was serious. Two hours later, we pulled the most dangerously creamy, peanut buttery thing out of my oven, and I've been making it ever since.
I brought this to a potluck once, nervously, because cheesecake can be finicky. Within twenty minutes the pan was empty and three people asked for the recipe. One woman told me she didn't even like peanut butter, but she'd had two slices anyway. That's when I knew this wasn't just another dessert.
Ingredients
- Nutter Butter cookies: The foundation of the whole dessert, their sandy peanut butter flavor becomes even more pronounced once baked into a buttery crust.
- Unsalted butter: Binds the cookie crumbs together without adding extra salt, letting the sweet and nutty notes shine through.
- Cream cheese: Must be fully softened or you'll end up with lumps no amount of mixing can fix, trust me on this one.
- Granulated sugar: Sweetens the filling just enough to balance the tang of the cream cheese and the richness of peanut butter.
- Vanilla extract: A small splash that deepens all the flavors and makes the whole cheesecake smell like a bakery.
- Large eggs: They give the filling structure, but add them gently or the texture turns dense instead of creamy.
- Creamy peanut butter: Go for the regular kind, not natural, it blends smoothly and doesn't separate as it bakes.
- Heavy whipping cream: Whips up into those glorious clouds that make every slice feel like a celebration.
- Powdered sugar: Sweetens the whipped cream without any graininess, and it holds its shape beautifully in the fridge.
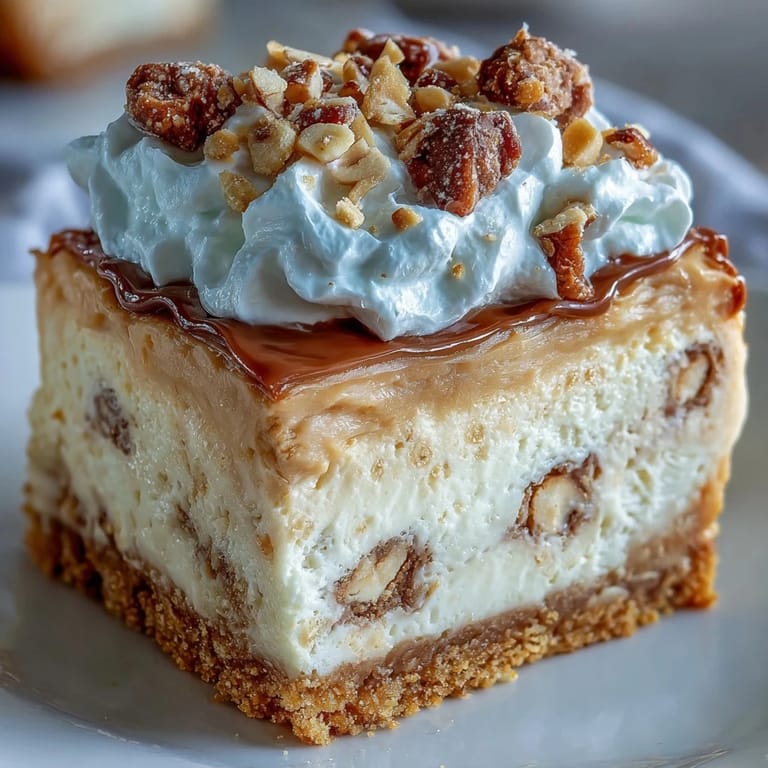
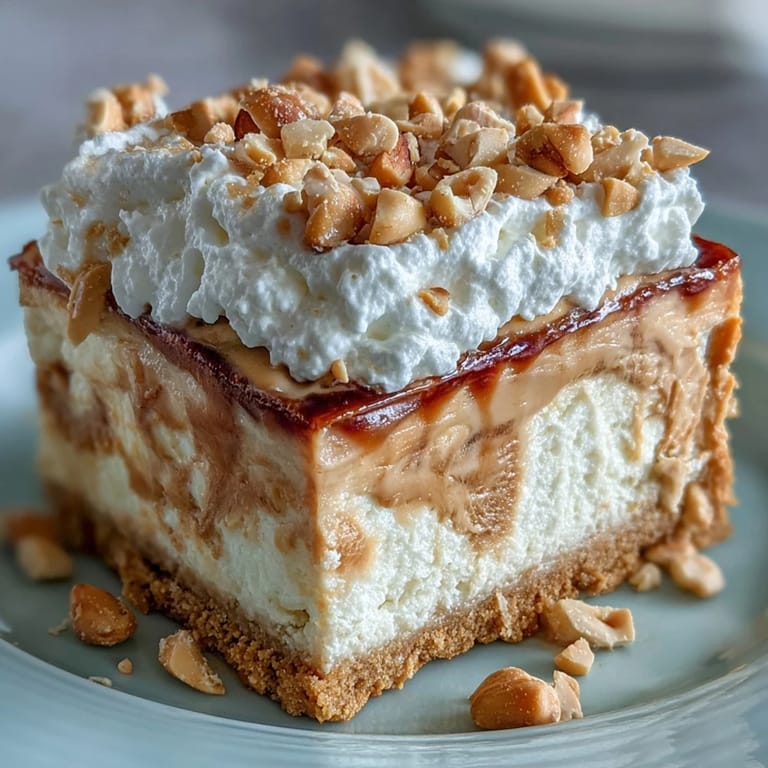
- Chopped peanuts: Optional, but they add a welcome crunch and a little visual flair on top.
Tired of Takeout? 🥡
Get 10 meals you can make faster than delivery arrives. Seriously.
One email. No spam. Unsubscribe anytime.
Instructions
- Prep the pan:
- Preheat your oven to 325°F and line the bottom of a 9 inch springform pan with parchment paper, then grease the sides lightly. This step saves you from heartbreak later when you try to unmold it.
- Build the crust:
- Crush the Nutter Butters until they're fine crumbs, then stir in melted butter until everything looks like wet sand. Press it firmly into the pan bottom using the back of a measuring cup, then bake for 10 minutes and let it cool completely.
- Beat the base:
- In a large bowl, beat softened cream cheese and granulated sugar with an electric mixer on medium speed for 2 to 3 minutes until it's silky and lump free. Scrape down the sides halfway through so nothing hides in the corners.
- Add the peanut butter:
- Mix in vanilla extract and creamy peanut butter until fully blended and the color is even throughout. The smell at this stage is intoxicating.
- Fold in eggs:
- Add eggs one at a time on low speed, mixing just until each one disappears into the batter. Overmixing here creates too much air, which leads to cracks.
- Fill and smooth:
- Pour the cream cheese mixture over the cooled crust and smooth the top gently with a spatula. Tap the pan on the counter a few times to release any air bubbles.
- Bake low and slow:
- Slide the pan into the oven and bake for 50 to 60 minutes, until the edges are set but the center still jiggles slightly when you nudge the pan. It will firm up as it cools.
- Cool in the oven:
- Turn off the heat, crack the oven door open, and let the cheesecake sit inside for a full hour. This gradual cool down is the secret to avoiding those dreaded cracks.
- Chill completely:
- Remove the cheesecake from the oven and refrigerate it for at least 4 hours, though overnight is even better. Patience here pays off in texture.
- Whip the topping:
- Just before serving, whip the heavy cream with powdered sugar until stiff peaks form. Spread it generously over the chilled cheesecake, making soft swoops and swirls.
- Garnish and serve:
- Sprinkle chopped peanuts on top and tuck a few whole Nutter Butters around the edge if you're feeling fancy. Slice with a hot, dry knife for clean cuts.
 Save Pin
 The first time I made this for my dad's birthday, he ate a slice standing at the counter before dinner was even served. He looked at me with his mouth full and said it was better than any bakery version he'd ever had. That moment made all the waiting and the careful steps worth it.
How to Avoid Cracks
Cracks happen when the cheesecake cools too quickly or gets jostled while it's still soft. The slow oven cool down is your best defense, but you can also bake it in a water bath by wrapping the springform pan in foil and setting it in a larger pan filled with hot water. The steam keeps the surface moist and even. I've done it both ways, and honestly, the whipped cream hides any imperfections so well that I don't stress about it anymore.
Make Ahead and Storage
This cheesecake actually improves after a night in the fridge, the flavors meld and the texture becomes even creamier. You can make it up to two days ahead, just wait to add the whipped cream until a few hours before serving so it stays fluffy. Store any leftovers covered in the fridge for up to five days, though in my house it never lasts that long.
Serving Suggestions
I love serving this with a drizzle of warm chocolate or salted caramel sauce, it turns each slice into something almost decadent. You can also crumble a few extra Nutter Butters on top right before serving for added crunch. If you're feeling adventurous, a small scoop of vanilla ice cream on the side makes it feel like a full dessert experience.
- Use a hot knife wiped clean between slices for the neatest presentation.
- Let the cheesecake sit at room temperature for about 10 minutes before slicing, it cuts more cleanly when it's not ice cold.
- Leftover whipped cream can be dolloped on individual slices as you serve them if you prefer a lighter topping.
 Save Pin
 This cheesecake has become my go to whenever I want to make someone feel special without saying too much. It's rich, it's comforting, and it tastes like you spent all day in the kitchen even though most of the work is just waiting.
Recipe FAQs
- → Can I make this cheesecake ahead of time?
Yes, this cheesecake can be made a day ahead. In fact, allowing it to chill overnight enhances the flavor and ensures a perfectly set texture.
- → How do I prevent cracks in my cheesecake?
To minimize cracking, avoid over-mixing the batter, especially after adding eggs. Additionally, cooling the cheesecake gradually in the oven with the door cracked helps prevent sudden temperature changes.
- → What is a water bath and do I need one?
A water bath involves placing the springform pan in a larger pan filled with hot water during baking. While optional, it creates a moist environment that helps achieve a creamier texture and reduces cracking.
- → Can I substitute crunchy peanut butter for creamy?
Yes, you can use crunchy peanut butter if you prefer added texture throughout the filling. The cheesecake will have small peanut pieces distributed within.
- → How long does this cheesecake last in the refrigerator?
Properly stored in an airtight container or covered tightly, this cheesecake will stay fresh in the refrigerator for up to 5 days.
- → Why should cream cheese be softened before mixing?
Softened cream cheese blends more easily, creating a smooth, lump-free filling. Cold cream cheese can result in a grainy texture and uneven mixing.