Save Pin
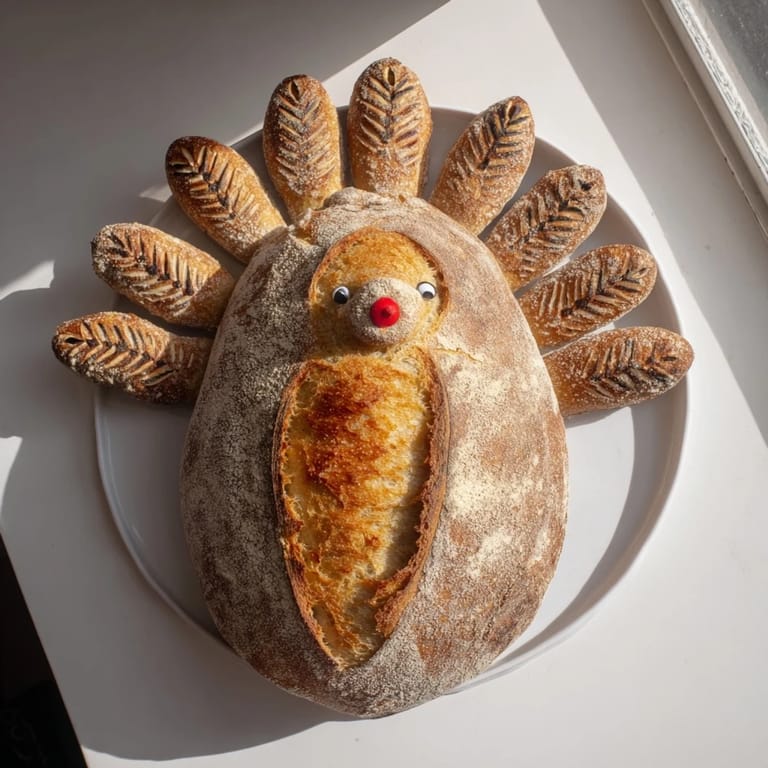
 The first time I crafted this turkey-shaped sourdough, my kitchen filled with an earthy, yeasty aroma that seemed perfect for fall gatherings. My hands worked the dough while outside, leaves tumbled across our yard in bursts of amber and crimson. I remember laughing when my daughter peeked into the oven and exclaimed, "That bread is looking at us!" The olive eyes did give it a somewhat accusatory stare, but the final loaf brought such delight to our Thanksgiving table that I've made it every year since.
Last Thanksgiving, my brother in law was skeptical when I mentioned a bread turkey centerpiece. He rolled his eyes when I slid the loaf onto the table, but after tasting a slice slathered with salted butter, he quietly asked if I could teach him how to make it. We spent the following weekend covered in flour, comparing sourdough techniques, and bonding over the therapeutic rhythm of kneading and folding that had become so centering for me during the pandemic.
Ingredients
- Bread Flour: The higher protein content creates the perfect structure for those dramatic turkey feathers and helps achieve that satisfying chewy interior.
- Active Sourdough Starter: Use it at peak activity when its doubled in size and looks bubbly for the best rise and that complex tangy flavor.
- Black Olives: These create the most expressive eyes giving your bread turkey personality a trick I discovered when raisins looked too friendly for such a dignified centerpiece.
- Red Bell Pepper: This creates the perfect wattle, softening beautifully in the oven while maintaining its brilliant color.
Tired of Takeout? 🥡
Get 10 meals you can make faster than delivery arrives. Seriously.
One email. No spam. Unsubscribe anytime.
Instructions
- Begin with the autolyse:
- Mix just the flour and water in your largest bowl until no dry spots remain. The dough will look shaggy and uncertain at this stage, but trust the process.
- Wake up the dough:
- After resting, work your bubbly starter and salt into the dough, feeling it transform from lifeless to responsive beneath your fingertips. Each stretch and fold set will make it increasingly elastic and cooperative.
- Shape your turkey:
- With floured hands, gently divide and form your pieces the body should be plump and confident, while the tail feathers can be artistic and varied. Think of this as edible clay sculpting.
- Create the details:
- Score feather patterns with confident, deliberate slashes rather than hesitant cuts. The olive eyes should be pressed firmly into the head to prevent them from popping out during baking.
- Bake with drama:
- The initial high heat creates that spectacular oven spring that brings your creation to life. You might gasp watching through the oven window as your bird seemingly inflates and transforms.
 Save Pin
 My neighbor Margaret knocked on my door last Thanksgiving morning, frantic because her gravy had broken and guests were arriving in an hour. As we worked to save her sauce, I slid my turkey bread into her oven to finish baking. When we pulled it out, golden and glorious, her grandchildren gathered around, wide-eyed and whispering. One little boy asked if he could take a picture before we cut into it. In that chaotic, warm kitchen, with children photographing bread and adults laughing over near cooking disasters, I felt the true spirit of the holiday more than ever.
Creating the Perfect Crust
The secret to that crackling, rustic crust lies in moisture and heat working together. I discovered this accidentally when my spray bottle broke and I resorted to tossing ice cubes into a hot pan on the bottom rack. The resulting steam bathed the loaf, creating a thin, gelatinized layer that eventually transformed into that satisfying crust that shatters slightly when sliced. The contrast between crust and the tender interior creates a textural journey that makes people close their eyes while chewing the first bite.
Working with Sourdough Timeline
I found my rhythm with this recipe after many iterations, realizing that working backward from serving time is essential. For a 2PM Thanksgiving table, I mix my autolyse the night before around 7PM, add the starter before bed at 10PM, shape in the morning around 7AM, and bake by 10AM. This leaves ample time for the loaf to fully cool before slicing, which prevents the dreaded gummy interior. When rushing once for unexpected guests, I sliced too early and watched the bread collapse under the knife a heartbreaking moment no baker forgets.
Making It Your Own
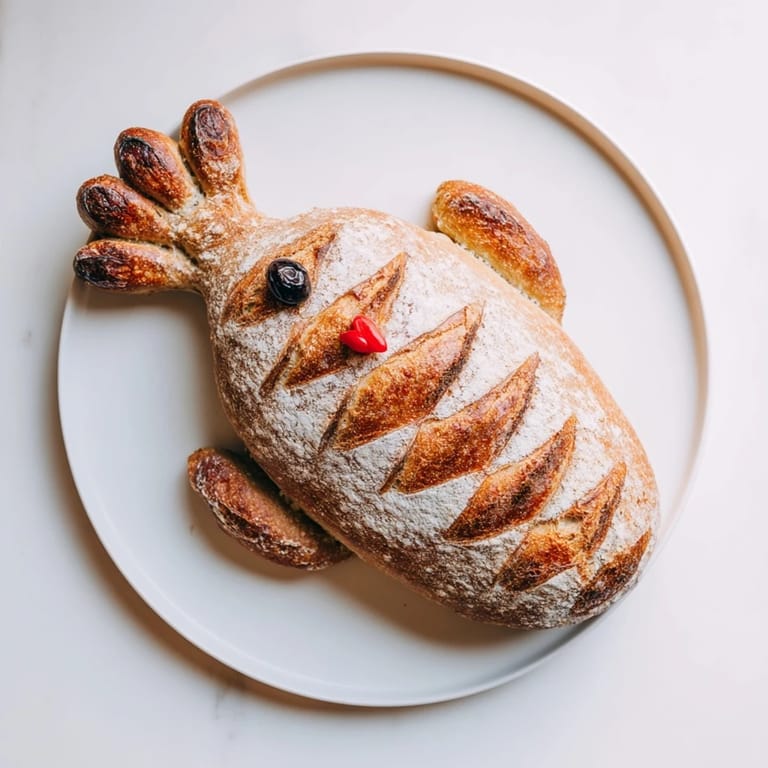
Each turkey bread I create emerges with its own personality, quirks, and charm much like the guests around your holiday table. One year, I incorporated cracked pepper into the dough, creating speckled feathers that looked startlingly realistic. Another time, I mixed dried cranberries into a portion of dough for colorful tail feathers, which delighted the children but scandalized my sourdough purist friend.
- Consider using herbs from your garden pressed into the surface before baking thyme leaves create beautiful feather textures while rosemary sprigs make impressive tail features.
- For a stunning presentation, brush different sections with various washes egg yolk for golden yellow, coffee for deep brown, and beet juice for reddish hues.
- Remember that room temperature dough is more cooperative during shaping cold dough from the refrigerator will fight back and potentially tear.
 Save Pin
 When the turkey bread appears at our table now, it carries more than flavor it holds memories of flour dusted mornings, kitchen mishaps, and the faces that have gathered around it year after year. This might just be dough transformed by time, temperature and technique, but somehow, it becomes something greater when shared with those you love.
Recipe FAQs
- → How long does this sourdough take to prepare?
Total time is 11–13 hours from start to finish. This includes 30 minutes of active preparation, 10–12 hours of fermentation and proofing, and 40 minutes of baking. Most of the time is hands-off fermentation, allowing flavor to develop naturally.
- → Can I make this vegan?
Absolutely. Skip the egg wash or substitute with plant-based milk for shine. All other ingredients—flour, water, sourdough starter, and salt—are naturally vegan. Decorative elements like olives and peppers are vegan-friendly.
- → What temperature should my kitchen be for fermentation?
Ideal bulk fermentation occurs at 21–23°C (70–74°F). Cooler temperatures slow fermentation, resulting in more complex flavors; warmer temperatures speed it up. Room temperature works well for most home kitchens.
- → How do I shape the turkey design?
Shape the dough into an oval for the body, a smaller round for the head, and several teardrop shapes for tail feathers and wings. Assemble on parchment, securing pieces with water, then score feather details with a sharp knife or bread lame for realistic definition.
- → Why use a baking stone or steel?
A preheated stone or steel conducts heat directly to the dough's bottom, creating the coveted crispy crust characteristic of artisan sourdough. It also ensures even browning and better oven spring during baking.
- → What should I do if my dough isn't doubling during bulk fermentation?
Check your sourdough starter's activity—it should be bubbly and active before use. If your kitchen is cooler, extend fermentation time by 1–2 hours. Ensure your starter is fed regularly and reaches peak maturity before mixing into dough.